

How to remove and fill in a pet door or cat flap. Nothing against cats – we just don’t have one!
We’ve been busy lately with quite a few house renovation projects. We almost finished that powder room, and family room, we ripped up lots of old carpet in our upstairs, and replaced and started refinishing the floor, painted this and that, replaced some light fixtures and so on.

The trouble is, we start too many small projects, without finishing the big ones first. That’s OK, we will get to them, but then there isn’t a perfect Instagram-after picture to finish things up and post!
Sometimes, we do all the fun stuff (you know – demolition, painting walls, hanging pictures and buying stuff), but you really have to putter around and finish the small details too! These small things are boring and unspectacular, – putting switchplates on, caulking around the trim, and filling holes here and there. Yawn! Like fixing doors and filling holes…..
We love our Original Wooden Doors
Our 1890s home has the original wooden doors throughout, and they have survived mostly intact. We want to keep them as they are! We have removed hooks, filled in holes, and filled in some stain here and there. In our kitchen, we have a door that leads to the basement – woodstained on one side, with peeling apple green paint on the other side. We have a rule in our house that this door needs to be closed tightly at all times, as some of us (I’m not saying who – but it’s the boys…….) are afraid of the spiders and any potential other creatures that may come up from downstairs.
What to do with Old Cat Door
Now I think my husband conquered the mice by sealing up all the holes that we could find, but you never know, and I just can’t say there are no spiders – sorry.
This door featured a cat door. But we have no cat, and Max (our 100 pound GoldenDoodle) will not fit through, so it needed to get it replaced or filled in. The old cat door was ugly, and my husband was convinced that creatures could come through it from the basement.
Replacement Door
A replacement door might well be the most efficient solution – but fitting a new door to an old doorframe isn’t exactly the easiest home improvement project. We also wanted to find something that matched the rest of our interior doors – and that just wasn’t possible!
We shopped around for a replacement door, but had no luck finding a similarly sized one that matches our other doors.
(We were also hampered by the pandemic – no one was willing or able to custom cut doors at the time!)

Ugly Cat Door
But the ugly cat door and hole in the door needed to go. I guess the cat had to have the hole cut at a certain height, but it was cut through the thinner panel, and then part of the thicker part of the door. You would think if you were cutting a hole in a door you would cut it through one panel instead of through both the thick and thin parts of the door, wouldn’t you?

I took off the panel and surrounding trim. (I unscrewed some small wood screws and then pried off the panel with a flat edge screwdriver).
It was filled with old cat hair – ewww.
How to Fill the Cat Door Hole
I had wondered for a few days how to fill in the hole. If the hole had been evenly through one panel, I would have purchased some plywood and perhaps placed it over top of the hole – possibly on both sides. This wasn’t going to work though. I thought I might try to fill the hole from inside! I measured the depth of the hole and travelled to Michael’s to see what I could find.
I found some one inch styrofoam panels at Michael’s and hoped that this might do the trick. Thick wood or something heavier, might have been too heavy to glue into the hole, so styrofoam or perhaps even insulation panels just might do the trick. (I thought!)
I measure the hole and cut the styrofoam to the size of the hole with an kitchen knife! (Don’t tell the chef!)

Glue with Wood Glue
I glued the foam in place with wood glue. I actually surprised myself that the foam piece fit so well and stayed in place! I let the glue dry.

Apply Wood Filler
I applied wood filler to the stained door side, and drywall compound to the painted side.
The wood filler was applied because I wanted to apply wood stain to attempt to match the appearance of the outside of the door. On the painted inside of the door, I applied drywall compound – because I had a big bucket of premixed compound on hand, and was able to apply more thickly on this less visible side.
Lightly Sand
After everything was dried, I sanded lightly with a block on both sides.


Mixed My Own Milk Paint Colour
For the painted side, I decided to go with a milk paint in a yellow – similar to our retro yellow refrigerator. We couldn’t buy mixed paint colours in our big box reno stores at the time of this project due to our pandemic lockdown. I purchased some yellow cottage paint (Cottage Paint – in Canary Yellow) online and thinned it with some white latex paint that I had in my basement supply – to lighten the colour.


Apply Wood Stain for Faux Wood Finish
To the stained side of the door, I applied an assortment of MinWax wood stains also from the basement supply. It wasn’t long until the colour was close to the rest of the door. Then, I decided to get fancy and try to draw some woodgrain in with pens and a small paintbrush. This seemed like a good idea, but didn’t work at all. It made the door look like it had some mysterious dark spot – but it doesn’t look like a Cat-Door!
I applied a coating of Stain and Poly in Satin (less sheen than gloss), over the entire stained side of the door. This helps to tone down the stain colour differences over the whole door, and the Satin finish, tones down the gloss that was on the door, also to de-emphasize the “fix”.

How to Remove and Fill in a Cat Door (Pet Door)
Here are some steps to remove the pet door and hole if you are doing this at home!
- Remove the cat door flap: Depending on the type of cat door you have, this may involve unscrewing the flap or simply popping it out of its track. Make sure to keep any screws or other hardware in a safe place in case you need them later.
- Measure the hole: Use a tape measure to determine the exact size of the hole left behind by the cat door. You will need to measure depth of hole as well! You’ll need this measurement when you purchase a filler material. You might also consider to cut a paper template out traced over the hole.
- Choose a filler material: There are a variety of materials you can use to fill in a cat door, including wood, drywall, and foam insulation. Choose a material that matches the surrounding surface and is easy to work with – styrofoam is light and easy to cut!
- Cut the filler material to size: Using your measurement from step 2, cut your filler material to the appropriate size. You may need to use a saw or other cutting tool, depending on the material you’re using. I used a kitchen knife – as it cut deeper than a boxcutter blade.
- Secure the filler material: Use screws or adhesive to secure the filler material in place. Make sure it’s flush with the surrounding surface and that there are no gaps or spaces where your cat could get through. I found wood glue worked well for styrofoam.
- Patch any holes or gaps: Depending on the material you used to fill in the cat door, you may need to patch any holes or gaps with spackle, joint compound, or another filler. I used stainable wood filler on one side and drywall compound on the other painted side.
- Sand the surface smooth once the filler has dried.
- Paint or finish the surface: If necessary, paint or finish the surface to match the surrounding area. This will help blend the filler material in and make it less noticeable. I did my best to create a stained wood look on one side and a painted look on the other.
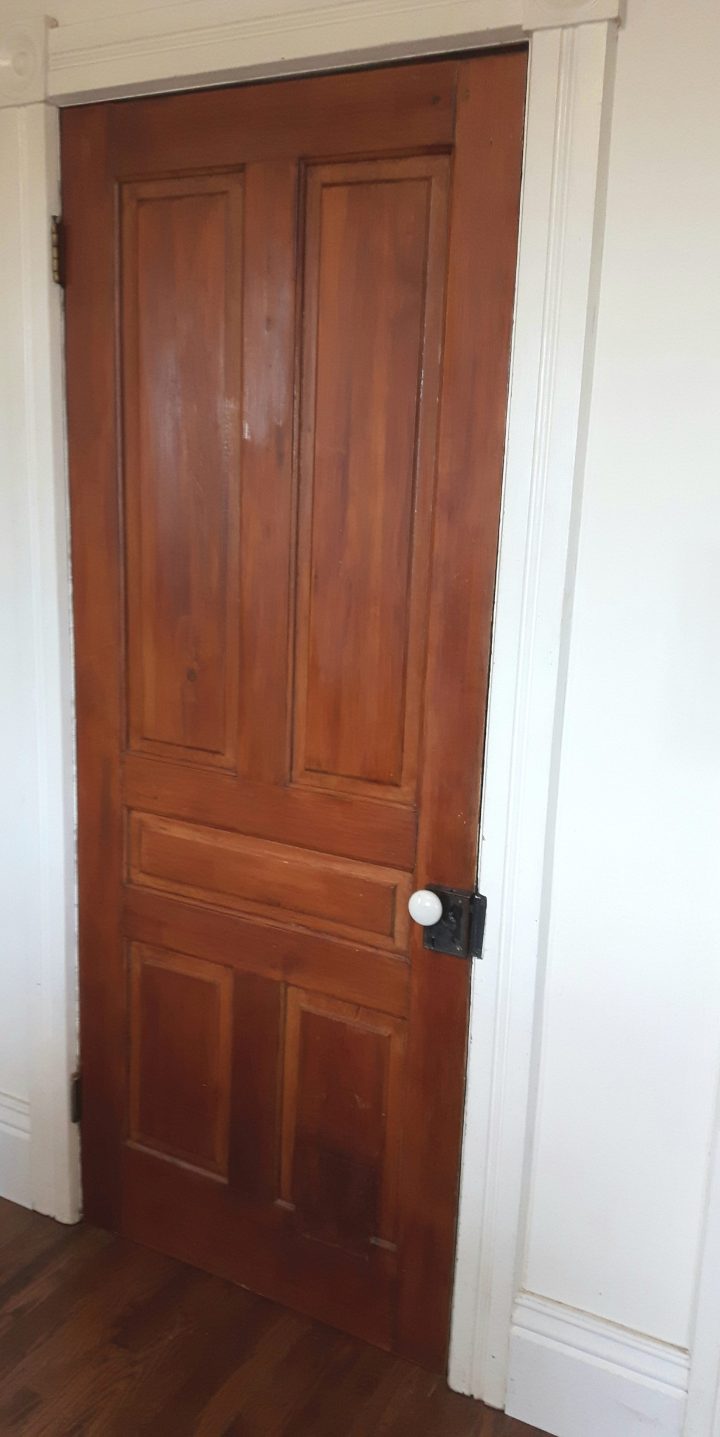
This was a simple job. It’s not perfect – I couldn’t match the stain exactly, and I didn’t try to match the profile of the door – where the different levels were cut through. It just made something ugly become less noticeable. In fact, NOBODY noticed that the cat-door was gone for days, which is kinda fun – and I’m pretty sure I saved the family from those basement spiders. It definitely doesn’t look perfect, and maybe we will venture out into the post-pandemic world and find the right door.
(2 years later the filled in hole is still firmly in place – and NOBODY has ever noticed it- which was the goal afterall!)
While I love of all of our ongoing big projects, sometimes getting a silly little project done makes me happy. We don’t live Instagram picture-perfect lives and sometimes we just have to work with what we have and try to fill holes while we can.
Thanks for stopping in at Everyday Lillie. Please have a look around as much as you like. If you enjoyed the visit, please feel free to follow, share, comment or like. Please drop in again soon!
Follow Everyday Lillie on WordPress.com
Great Story! Our motto for do-it-yourself projects of any sort — NEE (Nothing’s Ever Easy), but that’s when the creativity kicks in.
I’m going to borrow your motto – and your stirring the batter tradition.
You were really creative in attacking that project, and the results look great. No old house is ever perfect anyway.
Thanks Angela, it will have to do for now.
This is pretty cool. It’s hardly noticeable at all!
Thanks!
Thanks for the follow 🙂
You are welcome Rosaliene, I was sure I was following you all along, but I must have unfollowed somehow. I always enjoy your writing.
Whoa…pretty impressive job! Thank yoiuy for swinging by the “Ranch.” We 💙 visitors.
And thank you for visiting here! Happy fall!
I enjoyed this blog entry & your determination to remove the cat door. I might have tackled it but probably would have gotten frustrated &, in the end, just gotten a cat …
A cat would definitely be another solution! It was a fun challenge to conquer!